一看就会,一用就废,想到再补充。
加密破解
下载 hashcat 和 John the Ripper,并分别解压
- 首先使用John,进入到根目录下的run目录,以破解 .zip 为例,在 cmd 输入如下命令获取 .zip 密码的hash值:
1 | zip2john.exe .\example.zip |
会输出以下字段:
1 | $pkzip2$3*1*1*0*8*24*7126*4835*7d4dc8f4a715240c8147d85da42245f0036be3065c749ba1aff6ae567f704078690157f2*1*0*8*24*6490*8801*e6c3dd60e7c658461926cb7ad62fde2da0e5eca0cf19edc3d49953445fa73731b1fc8fde*2*0*cd*140*bbef0185*f3108f5f*5d*8*cd*bbef*be11*6a248bfcd8f7c1612114bf8fa22b4aae5da1c1a6dfe44e20b1fd2a6db5ebd9963840e935449528deb4d5d3872118f1906af7c4d57d4bcdc8f5cbd7eb6773266b8f03b0b0a10a2f95b6ab4e593555871379cea0d74ee3e0a15495b44b1fd7ea8749dd690dfef3a98bc5bf05e707b376d2292373805375b138401420324b4e9e2d33567f6905ba295c69edc5ab48aceb704df56b40dfc268cf7f824c384888a1768f786eb4be9793ab43857b86adadf02c1c2583e8f77cbb62e02a54a02ef8a69232834a8f1d69bc09c4572857d2*$/pkzip2$ |
- 在 hashcat 的目录下使用命令行进行破解:
1 | hashcat -a 3 -m 17225 -d 1 --show $pkzip2$3*1*1*0*8*24*7126*4835*7d4dc8f4a715240c8147d85da42245f0036be3065c749ba1aff6ae567f704078690157f2*1*0*8*24*6490*8801*e6c3dd60e7c658461926cb7ad62fde2da0e5eca0cf19edc3d49953445fa73731b1fc8fde*2*0*cd*140*bbef0185*f3108f5f*5d*8*cd*bbef*be11*6a248bfcd8f7c1612114bf8fa22b4aae5da1c1a6dfe44e20b1fd2a6db5ebd9963840e935449528deb4d5d3872118f1906af7c4d57d4bcdc8f5cbd7eb6773266b8f03b0b0a10a2f95b6ab4e593555871379cea0d74ee3e0a15495b44b1fd7ea8749dd690dfef3a98bc5bf05e707b376d2292373805375b138401420324b4e9e2d33567f6905ba295c69edc5ab48aceb704df56b40dfc268cf7f824c384888a1768f786eb4be9793ab43857b86adadf02c1c2583e8f77cbb62e02a54a02ef8a69232834a8f1d69bc09c4572857d2*$/pkzip2$ --increment --increment-max=16 --hwmon-disable |
其中
-a 3的参数意义是使用暴力搜索。-m 17225表示hash类型。-d 1表示使用的device,从id=1开始计数,可用的有独立显卡和集成显卡。--show表示展示密码结果。--increment表示使用增量模式,--increment-max表示使用的最大密码个数。--hwmon-disable表示禁止风扇状态监控。
更多参数详见https://hashcat.net/wiki/doku.php?id=oclhashcat&#background。
配置windows访问远程linux文件
安装samba包并添加samba用户:
1 | # 安装samba包 |
编辑配置文件 sudo vi /ect/samba/smb.conf,在该文件结尾追加以下内容:
1 | [localDir] |
其中(解释来自GPT-3.5),各行的含义如下:
- localDir: 本地用来访问远程的文件夹名称。
- comment: 设置共享文件夹的注释或描述。
- path: 指定共享文件夹在服务器上的路径。
- writable: 指定是否允许用户对共享文件夹进行写操作。
- browseable: 指定是否允许用户通过网络浏览该共享文件夹。
- available: 指定该共享文件夹是否可用。
- valid users: 指定可以访问该共享文件夹的用户。
- create mask: 指定新创建的文件的权限掩码。
- directory mask: 指定新创建的目录的权限掩码。
需要重启服务器使配置生效:
1 | sudo service smbd restart |
通过在 Windows 文件管理器中,输入\\remote-ip\localDir,输入登录账号和密码后可以访问远程 Linux 服务器中的 /remotePath 路径。
Windows
vcpkg
安装c++包:
1 | vcpkg.exe search [search term] // 搜索 |
执行这个命令会自动将vcpkg的库路径添加到项目的配置中,以便项目可以正确地使用vcpkg安装的库。
1 | vcpkg.exe integrate install |
host
windows 10 位置:C:\Windows\System32\drivers\etc
npm
查看npm源地址:
1 | npm config get registry |
临时使用:
1 | npm --registry [url] install [package] |
修改源地址:
1 | npm config set [url] |
源地址:
pip
windows下:C:\Users\[user]\pip的位置新建pip.ini,linux下:~/.pip/ 下新建pip.conf,修改示例如下:
1 | [global] |
临时使用:
1 | pip install [package] -i [url] |
源地址:
保存配置
1 | pip freeze > requirements.txt |
单次代理
1 | pip install xxx --proxy=http://127.0.0.1:port |
打印进度条
1 | pip install xxx --progress-bar on |
Linux
conda
先执行
1 | conda config --set show_channel_urls yes |
在生成.condarc文件,将文件内容修改为:
1 | channels: |
查看目前的源目录
1 | conda config --show |
删除添加的国内源,恢复默认源
1 | conda config --remove-key channels |
清除缓存
1 | conda clean -i |
镜像更新见:https://mirror.tuna.tsinghua.edu.cn/help/anaconda/
pip
1 | # 找到~/.pip/pip.conf,如果不存在就创建 |
docker
修改镜像源
1 | vi /etc/docker/daemon.json |
dokerfile中修改apt源
1 | RUN sed -i s:/archive.ubuntu.com:/mirrors.tuna.tsinghua.edu.cn/ubuntu:g /etc/apt/sources.list |
网络
修改DNS位置
1 | # 临时修改 |
查看DNS解析
1 | nslookup [url] |
ssh 正向代理
1 | ssh -L 16006:127.0.0.1:6006 hit@10.249.47.152 |
文件
显示前10条文件
1 | ls -1 | sort -u | head -10 |
批量更改目录下所有文件的后缀名,比如批量将JPEG修改jpeg
1 | rename 's/\.JPEG/\.jpeg/' ./* |
统计某文件夹下文件的个数:
1 | ls -l |grep "^-"|wc -l |
统计当前文件夹下目录的个数:
1 | ls -l |grep "^d"|wc -l |
统计当前文件夹下文件的个数,包括子文件夹里的 :
1 | ls -lR|grep "^-"|wc -l |
统计文件夹下目录的个数,包括子文件夹里的:
1 | ls -lR|grep "^d"|wc -l |
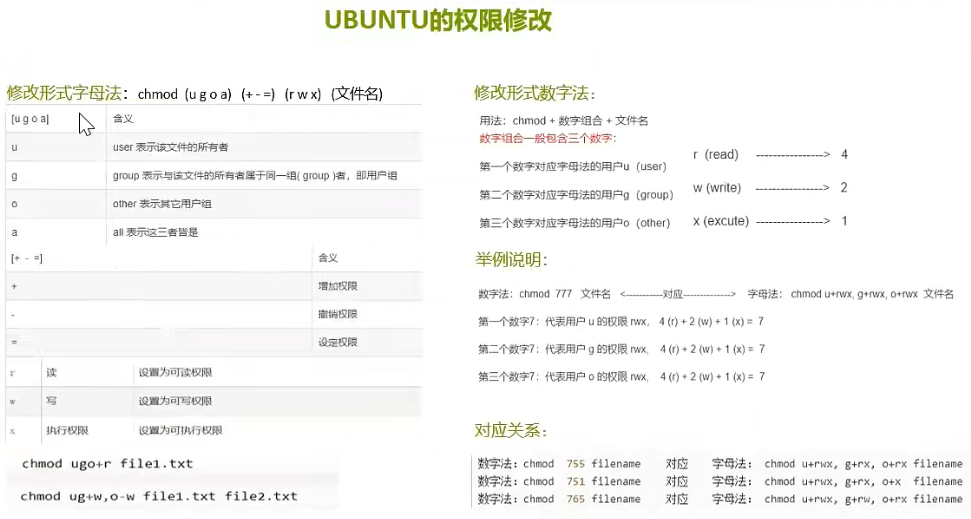
权限
删除
删除不以某种后缀结尾的文件,以.mp4为例
1 | ls | grep -v '.mp4$'| xargs rm -rf |
安装包
下载deb包:https://ubuntu.pkgs.org
进程
进程后台运行
1 | nohub [command] & |
查看运行进程
1 | ps -ef |
查看端口运行的进程
1 | lsof -i:[port] |
查看进程运行的端口
1 | netstat -anp | grep [processId] |
杀死进程
1 | kill -9 [processId] |
显卡僵尸进程
1 | fuser -v /dev/nvidia* |
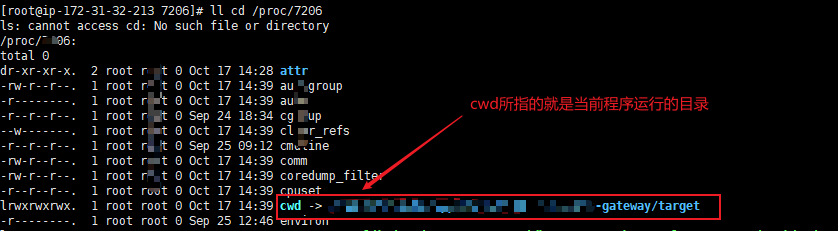
根据进程ID查询磁盘位置,执行命令
1 | cd /proc/进程ID |
cwd 所指的目录即为要查询的端口的程序运行目录
压缩和解压缩
reference:https://www.cnblogs.com/songanwei/p/9367319.html
tar命令
- -c: 建立压缩档案
- -x:解压
- -t:查看内容
- -r:向压缩归档文件末尾追加文件
- -u:更新原压缩包中的文件
这五个是独立的命令,压缩解压都要用到其中一个,可以和别的命令连用但只能用其中一个。下面的参数是根据需要在压缩或解压档案时可选的。
- -z:有gzip属性的
- -j:有bz2属性的
- -Z:有compress属性的
- -v:显示所有过程
-O:将文件解开到标准输出
-f: 使用档案名字,切记,这个参数是最后一个参数,后面只能接档案名
1 | -----------打包-------------- |
文件传输
scp和rsync(推荐)
简单使用
将本地文件复制到目标机器
1 | rsync -r /local-path username@remote-ip:/remote-path |
将目标文件复制到本地
1 | rsync -r username@remote-ip:/remote-path /local-path |
相比scp,rsync的优点在于断点重传。
多进程传输
需要先配置免密登录:
1 | # 创建一个秘钥 |
cd 到 sourcePath,在文件源文件目录中使用 xargs 进行多进程传输:
1 | $sourcePath: ls | xargs -n1 -P4 -I% rsync -rPa % username@remote_ip:targetPath |
其中(复制自GPT3.5):
-n1选项告诉xargs一次传递一个参数给命令,而-P4指定命令应该使用四个并行进程运行。-I%选项将占位符字符设置为%,用于表示传递给rsync命令的文件或目录。rsync -rPa %命令将由%指定的文件或目录同步到远程服务器,保留权限(-p)、时间戳(-t)和其他属性(-a)。-r选项告诉rsync进行递归同步。username@remote_ip:targetPath指定了文件将被同步到的远程服务器和目标路径。将username替换为远程服务器的用户名,remote_ip替换为远程服务器的IP地址或主机名,targetPath替换为文件将被同步到的远程服务器上的路径。
加入root权限
传送给远程服务器时权限不够可以通过下面命令给远程用户加入临时root权限:
1 | --rsync-path='/usr/bin/sudo /usr/bin/rsync' |
磁盘
查看
查看磁盘状态
1 | fdisk -l |
查看每个根路径的分区大小
1 | df -h |
返回该目录的大小
1 | du -sh [dir] |
挂载和解挂载
现在两台服务器上安装 nfs-kernel-server
1 | sudo apt install nfs-kernel-server |
随后在数据集所在服务器上使用以下命令进行编辑
1 | sudo vim /ect/exports |
文件编辑为,意思是将数据集所在服务的路径进行共享
1 | /[dataset-path] [target-ip](rw,no_root_squash,async) # 注意逗号间不能有空格 |
下一步是刷新nfs服务器,每当挂载新的路径时需要刷新该服务才能生效:
1 | sudo systemctl restart nfs-server.service |
在目标(如gpu)服务器上创建挂载目录,并使用一下命令将源服务器的共享路径挂载在目标服务器上:
1 | sudo mount -t nfs [source-ip]:/[dataset-path] /[target-path] |
取消挂载
1 | sudo umount -f /[target-path] |
分区及创建文件系统
1 | fdisk /dev/sda |
挂载数据磁盘
1 | sudo mkfs -t ext4 /dev/vdb |
显卡
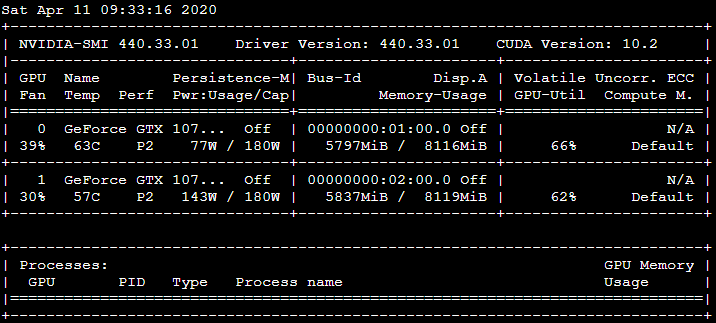
windows向下将C:\Program Files\NVIDIA Corporation\NVSMI加入到环境变量中
1 | nvidia-smi |
查看cuda版本
1 | nvcc --version |
查看cudnn版本
1 | cat /usr/local/cuda/include/cudnn.h | grep CUDNN_MAJOR -A 2 |
后台运行
nohup
命令:nphup [command] &
Screen
安装:
1 | apt-get install screen |
创建一个 screen:
1 | screen [screen-name] |
查看当前 screen:
1 | screen -ls |
回到指定 screen:
1 | screen -r [screen-name] |
删除指定 screen:
1 | screen -d [screen-name] |
tmux(推荐)
更多教程:http://www.ruanyifeng.com/blog/2019/10/tmux.html
安装:
1 | sudo apt-get install tmux |
创建一个tmux:
1 | tmux new -s [session-name] |
从当前tmux分离:
1 | tmux detach |
或者ctrl+b, d
切换回话:ctrl+b, s
接入指定会话:
1 | tmux attach -t [session-name] |
删除指定会话:
1 | tmux kill-session -t [session-name] |
内网穿透
frp
中文文档:https://gofrp.org/
github:https://github.com/fatedier/frp
概念
内网服务由于没有公网 IP,不能被非局域网内的其他用户访问。
用户通过访问服务端的 frps,由 frp 负责根据请求的端口或其他信息将请求路由到对应的内网机器,从而实现通信。
server端
配置:
启动:./frps -c ./frps.ini
client端
配置:
启动:./frpc -c ./frpc.ini
apt
修改apt源
1.备份系统自带apt-get源配置文件
1 | mv /etc/apt/sources.list /etc/apt/sources_old.list.bak |
2.编辑源配置文件/etc/apt/sources.list
1 | sudo vi /etc/apt/sources.list |
写入内容:
清华大学源
1 | deb http://mirrors.tuna.tsinghua.edu.cn/ubuntu/ xenial main restricted |
另外一个就是通过ppa的方式添加软件源:
1 | sudo add-apt-repository ppa:ubuntu-toolchain-r/test |
如果出现”add-apt-repository: command not found”的错误,需要先安装 add-apt-repository,命令如下:
1 | sudo apt install software-properties-common |
如果长时间卡住,可能是遇到外网无法访问的问题,需要在 ~/.bashrc 上就 http_proxy 和 https_proxy 环境变量写上代理网址和端口,通过添加-E选项进行代理:
1 | sudo -E add-apt-repository --update ppa:ubuntu-toolchain-r/test |
另外还有一种可能是CA证书失效,需要重新安装:
1 | sudo apt-get install --reinstall ca-certificates |
此时应该可以正常执行。
如果无法使用apt-get在该源安装包,需要在apt-get中加入代理选项,案例如下:
1 | sudo apt-get -o Acquire::http::proxy="http://127.0.0.1:7860" install [package] |
gcc和g++版本选择
上述方式配置ppa源之后,执行命令,其中11为版本号:1
2sudo apt-get install gcc-11
sudo apt-get install g++-11
另外如果一个服务器中含有多个gcc/g++版本,可以通过赋权的方式进行选择:
1 | sudo update-alternatives --install /usr/bin/gcc gcc /usr/bin/gcc-11 100 |
Pytorch
pretrain model存放位置
windows位置:C:\Users\user\.cache\torch\checkpoints
linux位置:/home/user/.cache/torch/checkpoints/
显卡驱动和CUDA
linux安装url:
linux重装显卡驱动和CUDA
1 | 1. 卸载显卡驱动 |
nvcc编译命令:
1 | nvcc -arch=compute_86 -code=sm_86 hello_cuda.cu -o hello_cuda -run |
nsys命令:
1 | nsys profile --stats=true ./hello_cuda |
Pycharm
debug时候卡死解决方案:
需要设置兼容模式
【File】 >>【Settings】 >>【Build, Execution, Deployment】>>【Python Debugger】 >> 勾选【Gevent compatible】
Git
拉取非本地配置的用户名密码的项目
1 | git clone http://userName:password@链接 |
设置和取消代理
1 | # 设置http: |
更新子模块
1 | git clone --recursive https://github.com/[project].git |
WSL
查看已安装的 WSL 发行版:命令行中输入 wsl -l -v 来查看已安装的 WSL 发行版及其状态
使用命令安装 WSL:输入 wsl.exe --install 命令,这将自动下载并安装 WSL 的最新版本
导出 WSL 系统:可以输入 wsl --export Ubuntu C:\Temp\ubuntu.tar 将其导出到 C:\Temp 目录下的 ubuntu.tar 文件中。
卸载默认安装的 WSL 发行版:输入 wsl --unregister Ubuntu命令来卸载默认位置安装的发行版。
导入 WSL 系统到指定位置,首先创建你想要安装到的指定位置,例如 D:\WSL\Ubuntu,然后使用wsl --import Ubuntu D:\WSL\Ubuntu C:\Temp\ubuntu.tar命令来导入 WSL 系统到指定位置。
wsl 使用root登录:wsl -d Ubuntu -u root
配置代理:
- 获取 Windows 的 IP 地址:在 Windows 的命令提示符或 PowerShell 中运行以下命令
ipconfig。找到以太网或 Wi-Fi 适配器对应的 IPv4 地址,例如192.168.1.100。 - 在 WSL 中配置代理环境变量:打开 WSL 终端,编辑
~/.bashrc或~/.zshrc文件(取决于你使用的 shell),添加以下内容:
1 | export http_proxy=http://192.168.1.100:7890 |