MinerU

地址:https://github.com/opendatalab/MinerU,转pdf公式为markdown公式

下载模型通过修改环境变量来修改huggface cache的地址,否则默认地址是C:\Users\Adminstrator\.cache\huggingface\hub

1
2
os.environ["HF_HOME"] = "E:\hub"
os.environ["HUGGINGFACE_HUB_CACHE"] = "E:\hub"

下载模型

1
2
3
pip install huggingface_hub
wget https://github.com/opendatalab/MinerU/raw/master/scripts/download_models_hf.py -O download_models_hf.py
python download_models_hf.py

如果已经下载model要执行一遍python download_models_hf.py,才能使环境变量生效。

配环境

1
2
3
conda create -n MinerU python=3.10
conda activate MinerU
pip install -U magic-pdf[full] --extra-index-url https://wheels.myhloli.com

调用命令

1
magic-pdf -p AttGAN.pdf -o AttGAN

windows编译

  1. 需要有python3环境
  2. git代理配置:
1
2
git config --global http.proxy 127.0.0.1:55664
git config --global https.proxy 127.0.0.1:55664
  1. 安装depot_tools到某一目录
1
git clone https://chromium.googlesource.com/chromium/tools/depot_tools.git

并配置depot_tools目录为环境变量

  1. 安装LLVM,如15.0.7。
  2. 下载skia源码,并切到一个chrome下分支
1
git clone https://skia.googlesource.com/skia.git
  1. 下载skia依赖库源码,跳转到别的分支编译,一直到 The changes made to environment variables only apply to the currently running shell instance...
1
2
3
cd skia
git checkout chrome/m125
python tools/git-sync-deps
  1. 下载 ninja
1
python bin/fetch-ninja
  1. PowerShell生成make文件(可选):
1
bin/gn gen out/debug --args/'clang_win=\"D:\LLVM\" cc=\"clang\" cxx=\"clang++\" extra_cflags=[\"/MTd\"] is_official_build=true is_debug=false skia_use_system_expat=false skia_use_system_libjpeg_turbo=false skia_use_system_libpng=false skia_use_system_libwebp=false skia_use_system_zlib=false skia_use_system_harfbuzz=false skia_use_system_icu=false skia_use_icu=false'
  1. 编译静态库(可选):
1
ninja -C out/debug

用于验证所有步骤是否正确,成功则在debug目录下出现.lib文件

  1. PowerShell生成sln工程:
1
bin/gn gen build/sln --args'clang_win=\"D:\LLVM\"' --ide=vs

在skia中使用vertex shader

1
2
3
4
5
6
7
8
9
10
11
12
13
14
15
16
17
18
19
20
21
22
23
24
25
26
27
28
29
30
31
32
33
34
35
36
37
38
39
40
41
42
43
44
45
46
47
48
49
50
51
52
53
54
55
56
57
58
59
60
61
62
63
64
65
66
67
68
69
70
71
72
73
74
75
76
77
78
79
80
81
82
83
84
85
86
87
88
89
90
91
92
93
94
95
96
void HelloWorld::onPaint(SkSurface* surface) {
auto canvas = surface->getCanvas();
canvas->save();
// Clear background
canvas->clear(SK_ColorWHITE);

SkPaint paint;
paint.setColor(SK_ColorRED);

static constexpr auto kRect = SkRect::MakeLTRB(20, 20, 120, 120);
static constexpr auto kUV = SkRect::MakeLTRB(0, 0, 20, 20);

static constexpr ColorVertex kColorQuad[]{
{0, 0x00FFFF00, {kRect.left(), kUV.left(), kRect.top(), kUV.top()}},
{0, 0x00FFFFFF, {kRect.right(), kUV.right(), kRect.top(), kUV.top()}},
{0, 0xFFFF00FF, {kRect.left(), kUV.left(), kRect.bottom(), kUV.bottom()}},
{0, 0xFFFFFF00, {kRect.right(), kUV.right(), kRect.bottom(), kUV.bottom()}},
};
static constexpr ColorVertex kColorIndexedQuad[]{
{0, 0x00FFFF00, {kRect.left(), kUV.left(), kRect.top(), kUV.top()}},
{0, 0x00000000, {100.f, 0.f, 100.f, 5.f}}, // unused
{0, 0x00FFFFFF, {kRect.right(), kUV.right(), kRect.top(), kUV.top()}},
{0, 0x00000000, {200.f, 10.f, 200.f, 10.f}}, // unused
{0, 0xFFFF00FF, {kRect.left(), kUV.left(), kRect.bottom(), kUV.bottom()}},
{0, 0xFFFFFF00, {kRect.right(), kUV.right(), kRect.bottom(), kUV.bottom()}},
};
static constexpr size_t kColorIndexedOffset = 2 * sizeof(ColorVertex);
static constexpr uint16_t kIndices[]{0, 2, 4, 2, 5, 4};
static constexpr size_t kIndexOffset = 6;

sk_sp<SkMesh::VertexBuffer> fColorVB =
SkMeshes::MakeVertexBuffer(kColorQuad, sizeof(kColorQuad));

auto data = SkData::MakeUninitialized(sizeof(kColorIndexedQuad) + kColorIndexedOffset);
sk_sp<SkMesh::VertexBuffer> fColorIndexedVB =
SkMeshes::MakeVertexBuffer(data->data(), data->size());

static constexpr SkColor kColors[] = {SK_ColorTRANSPARENT, SK_ColorWHITE};

static const Attribute kAttributes[]{
{Attribute::Type::kFloat4, 8, SkString{"xuyv"}},
{Attribute::Type::kUByte4_unorm, 4, SkString{"brag"}},
};
static const Varying kVaryings[]{
{Varying::Type::kHalf4, SkString{"color"}},
{Varying::Type::kFloat2, SkString{"uv"}},
};
static constexpr char kVS[] = R"(
half4 unswizzle_color(half4 color) { return color.garb; }

Varyings main(const in Attributes attributes) {
Varyings varyings;
varyings.color = unswizzle_color(attributes.brag);
varyings.uv = attributes.xuyv.yw;
varyings.position = attributes.xuyv.xz;
varyings.position.x += 500.0;
return varyings;
}
)";
static constexpr char kFS[] = R"(
uniform colorFilter filter;

float2 main(const in Varyings varyings, out float4 color) {
color = filter.eval(varyings.color);
return varyings.uv;
}
)";
auto [spec, error] = SkMeshSpecification::Make(
kAttributes, sizeof(ColorVertex), kVaryings, SkString(kVS), SkString(kFS));

if (!spec) {
SkDebugf("%s\n", error.c_str());
}
sk_sp<SkMeshSpecification> fSpecWithColor = std::move(spec);

sk_sp<SkShader> fShader =
SkGradientShader::MakeRadial({10, 10}, 3, kColors, nullptr, 2, SkTileMode::kMirror);
SkRuntimeEffect::ChildPtr nullChild[1] = {};
SkMesh::Result result = SkMesh::Make(fSpecWithColor,
SkMesh::Mode::kTriangleStrip,
fColorVB,
/*vertexCount=*/4,
/*vertexOffset=*/0,
/*uniforms=*/nullptr,
/*children=*/nullChild,
kRect);

if (!result.mesh.isValid()) {
SkDebugf("Mesh creation failed: %s\n", result.error.c_str());
}

paint.setAlpha(0x40);
canvas->drawMesh(result.mesh, SkBlender::Mode(SkBlendMode::kDst), paint);
canvas->translate(0, 150);
canvas->restore();
}

主要记录图形算法、建模思想,不记录公式推导和训练思路:

  1. 【Nerf】Representing Scenes as Neural Radiance Fields for View Synthesis.
  2. 【Mip-Nerf】Mip-NeRF: A Multiscale Representation for Anti-Aliasing Neural Radiance Fields.
  3. 【Mip-Nerf 360】Mip-NeRF 360: Unbounded Anti-Aliased Neural Radiance Fields
  4. 【Instant-NGP】Instant Neural Graphics Primitives with a Multiresolution Hash Encoding
  5. 【Plenoxels】Plenoxels: Radiance Fields without Neural Networks.
  6. 【Ref-NeRF】Ref-NeRF: Structured View-Dependent Appearance for Neural Radiance Fields
  7. 【3DGS】3d gaussian splatting for real-time radiance field rendering
阅读全文 »

矩阵

标准化矩阵

  1. 遍历矩阵每列求特征的平均值。
  2. 遍历矩阵每个元素减去该列的平均值。
阅读全文 »

Vscode

准备工作

官方文档:https://code.visualstudio.com/docs/cpp/config-mingw

参考:

  1. 在vscode运行c++:https://blog.csdn.net/weixin_62411288/article/details/130796591
  2. 在vscode用makefile运行opengl:https://blog.csdn.net/weixin_43952192/article/details/122877840
  3. VSCode-Clang-MinGW-OpenGl配置教程:https://apollomao.com/VSCode-Clang-MinGW-OpenGl%E9%85%8D%E7%BD%AE%E6%95%99%E7%A8%8B/
  4. vscode中文乱码解决:https://blog.csdn.net/weixin_51723388/article/details/124171357
阅读全文 »

  1. 本人是在 2023 年 5 月份开始学习相关论文,主要面向图像复原相关下游应用的预研工作,全职研究时间大约三个月,不算很长,认识有限。
  2. 写本博客的初衷是为了结构化一下之前学习的知识网络,如果看到外部链接的话就是在串接知识网络(从下一行就开始了),或许介绍一种或许更容易入门理解的方式(论文阅读顺序)。
  3. 本博客需要一定的数学基础,如果想了解 stable-diffusion-webui 或者 ComfyUI 的使用方法请绕路。
  4. 当然真正的勇士也可以像笔者之前一样直面惨淡的数学原理,当然也可以看本博客娓娓道来胡说八道
  5. 可能会以一种不太严谨的方式表达想表达意思,希望能多多包涵,不喜轻喷,也欢迎一起讨论!
阅读全文 »

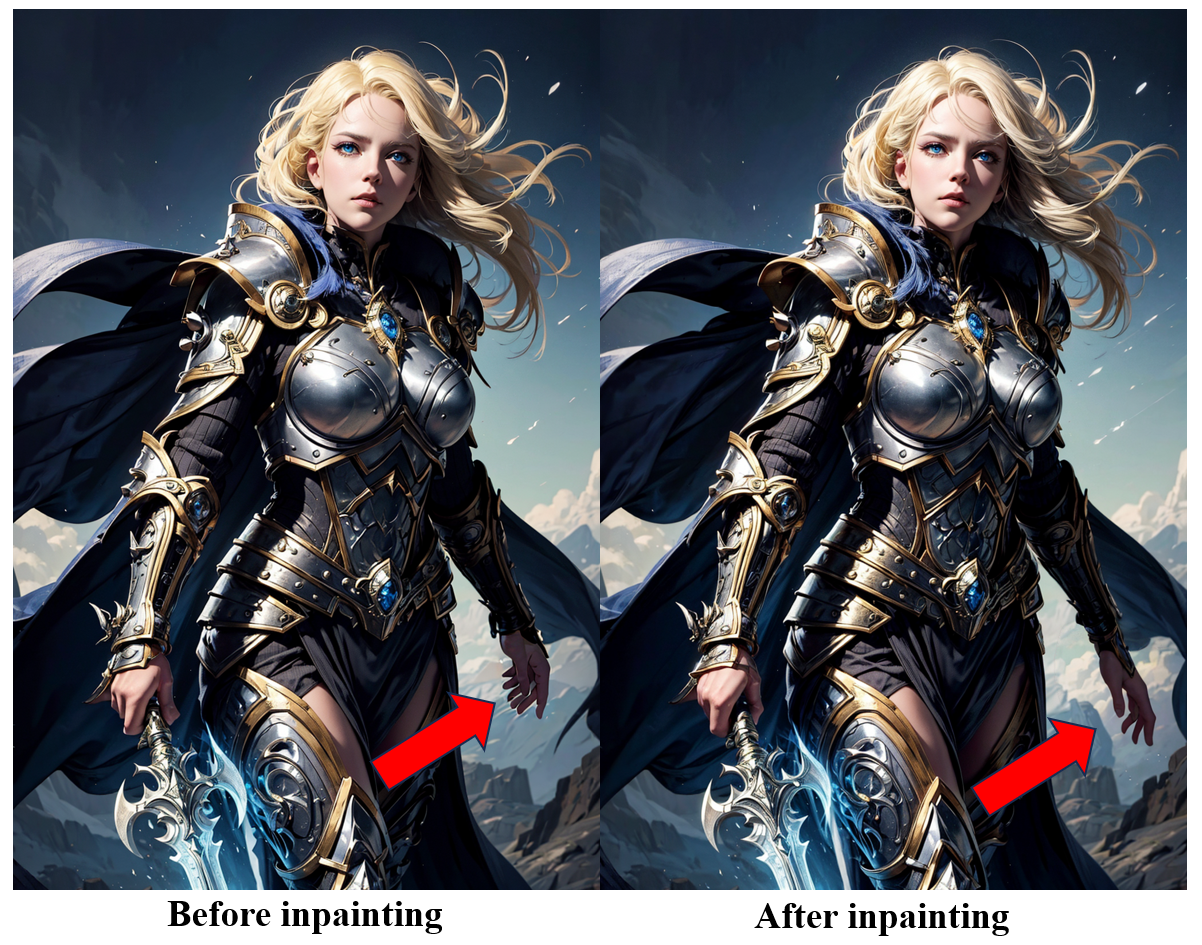
无论是在商用的midjourney V5,还是在基于开源的stable diffusion的text to image的AI生图中,一个难以绕过去的问题是,人物手部姿势的稳定生成。一个容易遇到的问题场景是,当用户使用精心设计的prompt和denoising parameter生成一张高分辨率的图片,从整体构图,到色彩、人物神情等都比较的满意的时候,却发现人物的手部姿势发生扭曲,最常见的是产生六指。如果此时通过调整参数如textural inversion、LoRA和controlNet等,又会改变生成图像的分布,达不到原来的生成效果。另外一种方案是使用inpainting的方式将畸形的手部区域进行重绘,但是如果没有合适的方法和技巧,仅仅靠不同的随机数搜索好的手姿的分布,其搜索范围将会很大,并且在设备有限的情况下比较耗时。如何设计一个高效的inpainting的工作流将是一个需要不断探索和实践的方向。

在这篇文章中,本人主要探索仅仅使用AI工具对手姿进行修复的工作流,不涉及其他工具如photoshop的使用(主要是没探索出来,用了效果一般)。以下是我复现的效果。

Effect of Inpainting

阅读全文 »

抽空记录中,不研究内容prompt,目前在别人写的prompt下用不同工具调优。

目前的感觉是,场景物体细节越多的图,人物手和面容(眼睛、睫毛)的正常生成非常困难,即使有相关的Lora和negative prompt的进行加持,但基本上只在肢体离镜头比较近的时候才能正常work。既要保证场景内容丰富,又要保证肢体正常绘制,基本不可能一次正确生成,目前的策略是在喜欢的构图上进行肢体细节调优。

基于stable-diffusion-webui 1.6.0写的使用说明,版本更新时间是20230928

预训练模型下载网站:

  1. https://civitai.com/
  2. https://www.liblibai.com/
  3. https://tusi.art/
  4. https://www.esheep.com/
阅读全文 »